It is possible to update modules from the command line without the graphical user interface. This is useful in headless environments. Only modules which are already installed can be updated. It is not possible to install new modules. For doing this the SNAP executable needs to be configured properly. This executable is located in the bin directory of the installation folder of SNAP. The name depends on the operating system you are working with. On Unix systems it is named snap.sh, on Mac OS X the name is snap.command and on Windows, it depends on the bitness of your system. On a 32Bit windows system, the executable is named snap.exe and on a 64Bit system it is called snap64.exe. In the following commands snap is used as a place holder for the executable file. You need to replace it with the appropriate one for your system.
Note
Currently, the commands hang after they are actually executed. You need to abort them by CTRL+C. See also SNAP-927.
Many thanks to Felix Glaser. He provided a bash script to work around this problem:
Given one has
pkillinstalled (should be available in macOS most Linux distros by default, not sure about other BSDs though) and uses the JRE that comes with SNAP, a very crude workaround is:
snap --nosplash --nogui --modules --update-all 2>&1 | while read -r line; do
    echo "$line"
    [ "$line" = "updates=0" ] && sleep 2 && pkill -TERM -f "snap/jre/bin/java"
done
This will terminate the Java process the SNAP update launched when the line "updates=0" is printed.
List available parameters
List the parameters with a description which can be passed to the executable.
snap --help
The parameter --nogui is missing in this list. This parameter prevents the SNAP GUI to be started.
List all modules
In order to get a list of all modules and the status if there is an update available you can call
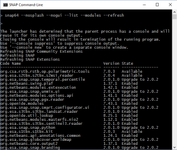
snap --nosplash --nogui --modules --list --refresh
This will give you an output similar to what you can see in the following image.
Update all modules
To update all modules which can be updated you need to call
snap --nosplash --nogui --modules --update-all
Update specific modules
In order to update just one or multiple specific modules you can call:
snap --nosplash --nogui --modules --update org.esa.snap.snap.ndvi org.esa.snap.snap.envisat.reader
Install a module
In order to install a new module file or from the repository:
Currently not working with file path - is under investigation. (SNAP-835)
It can happen that the log messages indicate that the update/installation process failed. In most cases, the update/installation is successful regardless of the messages.
See also this forum discussion: https://forum.step.esa.int/t/command-line-idepix-installation-in-snap-7-0-0/20687/4
snap --nosplash --nogui --modules --install <Path to the file> | <org.esa.snap.module.name>
More information regarding additional command possible one the modules can be retrieved by typing:
snap --nosplash --nogui --modules --help
Configure Proxy without GUI
The proxy settings can be provided in a properties file. This must be located in
On Windows: <USER_HOME>\AppData\Roaming\SNAP\config\Preferences\org\netbeans
On Unix: <USER_HOME>\.snap\config\Preferences\org\netbeans
In both cases, the file must be named core.properties.
proxyAuthenticationUsername=MyName
proxyAuthenticationPassword=MyPw
proxyHttpHost=www.samplehttp.int
proxyHttpPort=4816
proxyHttpsHost=www.samplehttps.int
proxyHttpsPort=1213
proxySocksHost=www.samplesocks.int
proxySocksPort=1214
proxyType=2
useProxyAllProtocols=true
useProxyAuthentication=true
WWWBrowser=SL[/Browsers/SystemDefaultBrowser
The above shows a not working example, but it shows at least some of the configuration options. A working example can be created by using the GUI once (maybe on another machine) and do the configuration. Afterwards pick-up the file and use it as your template.
One word regarding the password. The first time the configuration is used the password is read and removed from this property file. Instead, it is stored in a Keyring. So it is not publicly visible anymore.