Once you have checked out the project as described in How to build SNAP from sources you can configure IntelliJ IDEA.
Importing source code as a Project
- Select from the menu File/New/Project from Existing Sources or if you're on the Welcome Screen choose Import Project.
- Find the checkout directory of snap-engine. Keep the default values for all settings in the upcoming dialog. Just make sure that you select the option Import project from external model and that Maven is selected as the external model.
- Next, select from the menu File/New/Module from Existing Sources and select the snap-desktop folder. Keep again the default values.
- Repeat the last step for the other project you might have checked out.
- Open File/Project Structure. Ensure that as Project SDK a Java 8 version is selected and also for Project language level select the option 8 - Lambdas, type annotations etc. should be selected. Confirm the changes.
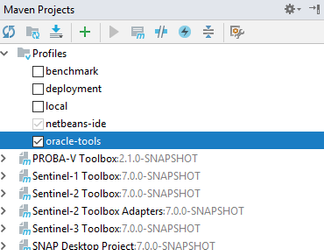
- On the right side of the IDE you find the Maven Projects tab. There you can invoke the Maven commands to build the project. You should configure this window by clicking on the gear symbol and selecting Group Modules.
Launching and Debugging
In order to launch and debug SNAP you need to create a run configuration. Before doing so you first need to build the project via maven. You can either do this from the command line or from the Maven window in Intellij IDEA. You simply need to invoke mvn package for each of the projects you have checked out. This is necessary to have the target directories available which will be referenced in the run configuration.
Run plain SNAP Desktop
Select Run/Edit Configurations and add a new configuration named Application.
In the following <snap-app> is an abbreviation for <myprojects>/snap/snap-desktop/snap-application/target/snap:
- Main class:
org.esa.snap.nbexec.Launcher - VM options:
-Dsun.java2d.noddraw=true-Dsun.awt.nopixfmt=true-Dsun.java2d.dpiaware=false-Dorg.netbeans.level=INFO-Dsnap.debug=true -Xmx4G - Program arguments:
--userdir "<snap-app>/../userdir" --patches "<myprojects>/snap/snap-engine/$/target/classes" - Working directory:
<snap-app> - Use classpath of module: snap-main
Note that in the configuration above, the SNAP user directory at <snap-app>/../userdir will be deleted after each clean build. This is by intention. If you want to keep your settings during development (not recommended), you can configure the SNAP user directory to any other location outside of the target directory.
The '$' character in the patches path is a place holder for all the sub-modules in this project.
you can add the --open option to the program arguments to specify one more paths to products which shall be opened on start up. Also a session file is possible.
Run SNAP Desktop with additional Toolboxes (S1, S2, S3, ...)
If you want to use one or more toolboxes with SNAP Desktop you need to do the following. Note that you can add multiple run configurations. One for plain SNAP Desktop, one which with s1tbx, one with smos, one with s2tbx and s3tbx, and so on.
You can use the previous configuration as template by copying it.
For Unix-users: In the following the ';' character is use to separate the paths. That's the seperator for Windows. On Unix based system you should use ':' instead,
Extend the --patches option to include the compile output of the toolboxes.
--patches "<myprojects>/snap/snap-engine/$/target/classes;<myprojects>/snap/s1tbx/$/target/classes;<myprojects>/snap/s2tbx/$/target/classes;<myprojects>/snap/s3tbx/$/target/classes"
Additionally the --clusters option needs to be set. The clusters contain all modules of a toolbox and are located in the so called kit module of each of them.
--clusters "<myprojects>/snap/s1tbx/s1tbx-kit/target/netbeans_clusters/s1tbx;<myprojects>/snap/s1tbx/s1tbx-kit/target/netbeans_clusters/rstb;<myprojects>/snap/s2tbx/s2tbx-kit/target/netbeans_clusters/s2tbx;<myprojects>/snap/s3tbx/s3tbx-kit/target/netbeans_clusters/s3tbx"
Run gpt
In order to run gpt directly from the IntelliJ IDEA you should use the following configuration.
- Main class:
org.esa.snap.runtime.Launcher - VM options:
-Dsnap.mainClass=org.esa.snap.core.gpf.main.GPT -Dsnap.home="<myprojects>/snap/snap-desktop/snap-application/target/snap"-Dsnap.extraClusters="<myprojects>/snap/s1tbx/s1tbx-kit/target/netbeans_clusters/s1tbx;<myprojects>/snap/s1tbx/s1tbx-kit/target/netbeans_clusters/rstb;<myprojects>/snap/s2tbx/s2tbx-kit/target/netbeans_clusters/s2tbx;<myprojects>/snap/s3tbx/s3tbx-kit/target/netbeans_clusters/s3tbx"-Dsnap.debug=true-Xmx4G - Program arguments:
-h - Working directory:
<snap-app> - Use classpath of module: snap-runtime
As Program arguments you can specify the arguments you usually use with gpt. If you have enough memory available you can increase the value for the Xmx option. This value defines how much memory SNAP can use. Make sure that you leave some spare memory for the OS and other applications.
Problems running Tests in IntelliJ IDEA
If test don't run and you see error messages in the log like the following:
gpf\src\main\java\org\esa\snap\core\gpf\doclet\SourceProductsDesc.java Error:(19, 23) java: package com.sun.javadoc does not exist Error:(27, 37) java: cannot find symbol symbol: class FieldDoc location: class org.esa.snap.core.gpf.doclet.SourceProductsDesc
Ensure that the oracle-tools profile is enabled. Sometimes IDEA forgets this setting.