NetBeans Development Introduction
Outdated
Please note, the following is an old document and has not been updated for a while. But it might still serve a starting point for users who want to start SNAP development with NetBeans.
This article describes how to build, run/debug, and design the SNAP Desktop GUI snaptop, which is a Maven project that uses the NB Platform.
Basics
Although we want to use our beloved IntelliJ IDEA for our actual development there are a few good reasons to use the NetBeans IDE in special cases: branding, adding new actions + windows, adding and modifying a module's layer.xml, using the cool profiler and the very nice GUI builder (ok, quite a lot of reasons). When the NB IDE is used to add new components it also automatically alters the POMs to contain the correct NB Platform module dependencies. This is a great plus as it is often unclear which NB Platform module contains what class or API. Furthermore, the NB IDE also shows us how it configures and invokes goals of the Maven NB Plugin (nbm), which we then can apply to IntelliJ IDEA as shown later in this article. The deployment of all our NB modules and launching the application is exclusively performed by the nbm plugin whose default configuration resides in the top-level POM. This is why the usage of the NetBeans IDE is introduced here as well.
It is assumed the SNAP Desktop repository code resides in a directory pointed to by ${snaptop} which currently (Oct 2014) has the following structure:
${snaptop}/
snap-app/ Maven module solely used to launch SNAP Desktop with the NetBeans Platform. Does not contain any sources.
snap-branding/ NB-Module providing resources for branding the NetBeans Platform. Will only contain resources.
snap-gui/ NB-Module providing core GUI components for SNAP Desktop. Here goes our initial GUI code.
To build the project using plain Maven, type
cd ${snaptop}
mvn install
After the project is built, the snap-app/target/snap directory represents a complete NB installation to which all the modules are deployed. It contains two NB module clusters, namely snap and platform as well as snap's configuration and it's native launchers.
${snaptop}/snap-app/target/
snap/
bin/ Native launchers for the SNAP application
etc/ SNAP configuration
platform/ NB platform cluster containg all NB platform modules and module configs
snap/ SNAP cluster containg SNAP-specific modules, module configs & SNAP app branding
To run the project using plain Maven, type
cd snap-app
mvn nbm:cluster-app nbm:run-platform
The nbm:cluster-app goal will make sure the app's NB clusters are up to date. The nbm:run-platform goals will invoke SNAP's native launcher snap located in ${snaptop}/snap-app/target/snap/bin. Of cource the launcher can be used-stand alone and also provides a number of options that can be used to further brand the application's appearance and behaviour. Type
cd target/snap/bin
snap --help
to get help on all possible platform options refer to NBI Native Launcher Command-Line Options and Startup Parameters. Most imporantly we may wish to pass specific JVM options and system properties to the app using the -J<option> syntax, e.g. -J-Xmx4G. The nbm Maven plugin can be configured to permanently pass options to the launcher, e.g.:
<pluginManagement>
    <plugins>
        <plugin>
            <groupId>org.codehaus.mojo</groupId>
            <artifactId>nbm-maven-plugin</artifactId>
            <version>3.14</version>
            <extensions>true</extensions>
            <configuration>
                <brandingToken>${brandingToken}</brandingToken>
                <cluster>${brandingToken}</cluster>
                <useOSGiDependencies>true</useOSGiDependencies>
                <additionalArguments>
                    --locale en_GB --fontsize 13 -J-Xmx4G
                </additionalArguments>
            </configuration>
        </plugin>
        ...
    </plugins>
</pluginManagement>
As stated before, the nbm:run-platform gloal calls the native launcher therefore it is important to know how this is done so that we can use IntelliJ IDEA to run and debug the app. Luckily, the NB IDE uses the nbm Maven plugin in a quite transparent and understandable way so that we are able to transfer this approach to IntelliJ IDEA.
The first run of the SNAP app also created a userdir directory that contains user-specific SNAP application information:
${snaptop}/snap-app/target/
userdir/
config/
Preferences/ User preferences store
Windows2Local/ Desktop GUI state persistence (e.g. which windows where open, which state, which position, ...)
var/
cache/ Module cache for faster startup, module state persistence
log/ Log files
The location of the snap deployment directory and the location of the userdir are both parameters of the nbm:cluster-app and nbm:run-platform goals.
Using the NetBeans IDE
Opening
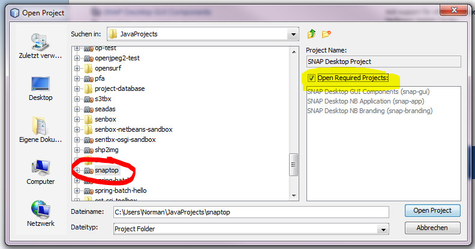
Open the snaptop project via File/Open Project by selecting it's source directory. Check Open Required Projects:
Building
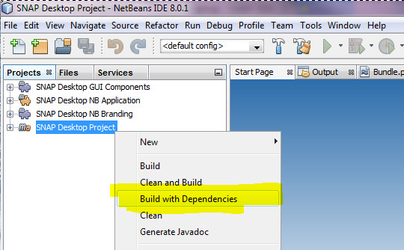
Select snaptop in the Projects window, right-click and select Build with Dependencies.
Note that the Output window shows the generated and invoked Maven command line and all the Maven output.
Running and Debugging
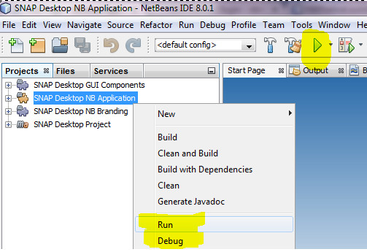
Select snap-app in the Projects window and run/debug it either using the toolbar buttons or from the context menu:
You should now see the SNAP splash screen and then the SNAP Desktop application window in its current development state. Again, note that the Output window shows the generated and invoked Maven command line and all the Maven output.
Branding
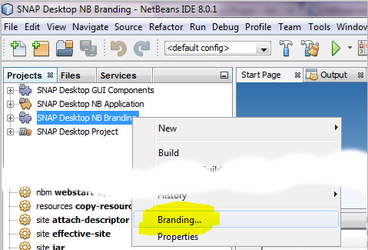
Select snap-branding in the Projects window, right-click to open the context menu and select Branding which open a dialog allowing us to specify icons, the splash-screen and overriding naming and terminolgy defaults used by the NB platform in form of localisation bundles.
After branding we need to rebuild the project in order to deploy any new branding resources.
Using IntelliJ IDEA
We now transfer the NB IDE's approach to run/debug the application to IntelliJ IDEA.
Opening
Open snaptop's POM:
Building
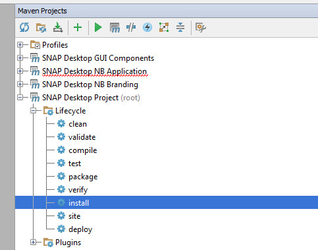
If not already done, build the entire project from the Maven Projects window using the snaptop parent POM's install lifecycle goal:
Changing POMs
After you've changed any POM files, most importantly after adding new NB Platform module dependencies, the install goal or better both the clean install gloals must be executed in order to rebuild the snap and NB Platform clusters.
Running
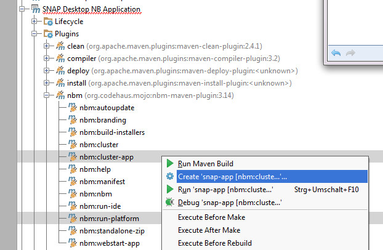
We'll first create an initial run configuration by selecting both the nbm:cluster-app and nbm:run-platform plugin goals from the snap-app module in the Maven Projects window.
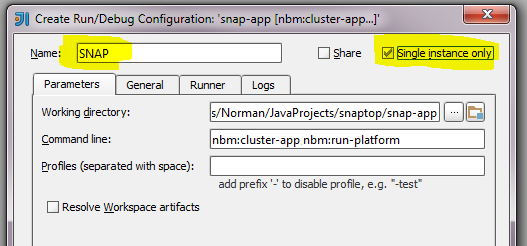
Rename the newly created configuration to SNAP, check Single instance only because otherwise the NB platform will moan, if more than one instance operate on the same NB userdir (see first section Basics):
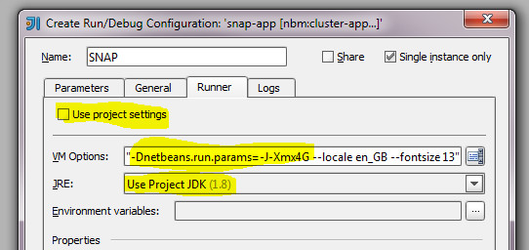
Now adjust the launcher options by selecting the Runner tab. Deselect Use project setting, change JRE to Use Project JDK (1.8) and set VM Options to "-Dnetbeans.run.params=-J-Xmx4G --locale en_GB --fontsize 13" (note that this is an example, also note that quotes are required):
Note that netbeans.run.params is a Maven user propery that overrides the plugin configuration parameter additionalArguments in the POM.
Click OK. We now can launch the app from IDEA's toolbar:
You should now see the SNAP splash screen and then the SNAP Desktop application window in its current development state.
Debugging
For debugging, we will use a Remote configuration that will connect to a running SNAP instance. This is also how the NB IDE is doing this. Open the Run/Debug Configurations dialog:
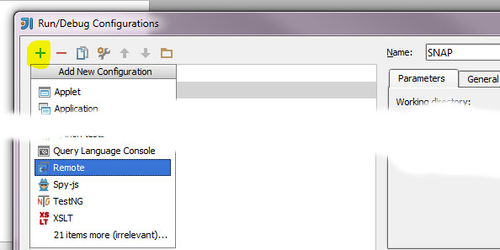
Click Add New Configuration (![]() ) and select Remote:
) and select Remote:
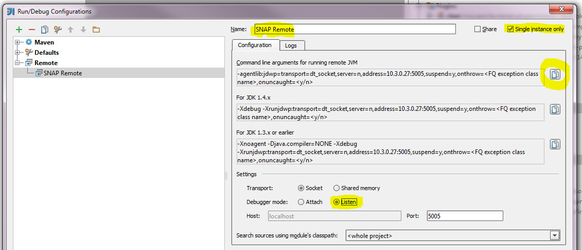
Name it SNAP Remote and select Debugger mode Listen. Then click the copy-to-clipboard action (marked yellow in the screenshot below) to fetch the command-line arguments:
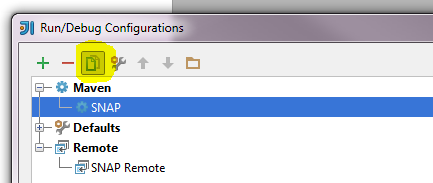
Don't close the dialog yet. Select the Maven SNAP configuration and copy it.
Name the new configuration SNAP Debug and copy the clipboard content into the VM Options field and prefix it with with a -J. Cut off the yet unused onthrow=<FQ exception class name>,onuncaught=<y/n> part:
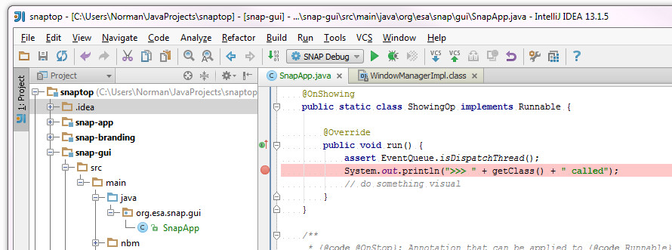
Click OK to safe the new configurations. We can now start debugging. Place a breakpoint in some code in snap-gui
and start the SNAP Remote configuration:
Then switch to the SNAP Debug configuration and Run it: (Don't use Debug, because this would start a debugging session for the JVM that is used to launch Maven!)
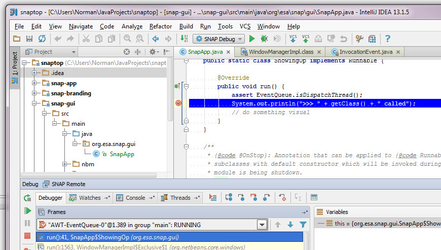
As expected, NB Platform debugging just works fine:
Hot Deployment
If you now exit the app and add some more lines of code and debug the app again you will notice that the code changes have not yet been deployed. Even though the nbm:cluster-app goal was executed before the laucher invocation. The reason for this is yet unclear to me (Norman), however when having a closer look on how the NB IDE configures the nbm Maven plugin, This is output of a starting debug session in the NB IDE (on Windows 7):
NetBeans: JPDA Listening Start...JPDA Address: Norman-PC:62291Port:62291cd C:\Users\Norman\JavaProjects\snaptop\snap-app; "JAVA_HOME=C:\\Program Files\\Java\\jdk1.8.0_25" cmd /c "\"\"C:\\Program Files\\NetBeans 8.0\\java\\maven\\bin\\mvn.bat\" -Djpda.listen=true -Dnetbeans.run.params.debug=\"-J-Xdebug -J-Xrunjdwp:transport=dt_socket,suspend=n,server=n,address=62291 -J-Dnetbeans.patches.org.esa.snap.snap.gui=../../../snap-gui/target/classes -J-Dnetbeans.patches.org.esa.snap.snap.branding=../../../snap-branding/target/classes\" -Dmaven.ext.class.path=\"C:\\Program Files\\NetBeans 8.0\\java\\maven-nblib\\netbeans-eventspy.jar;C:\\Program Files\\NetBeans 8.0\\java\\maven-nblib\\netbeans-cos.jar\" -Djpda.address=62291 -Dfile.encoding=UTF-8 nbm:cluster-app nbm:run-platform\""Running NetBeans Compile On Save execution. Phase execution is skipped and output directories of dependency projects (with Compile on Save turned on) will be used instead of their jar artifacts.Scanning for projects...
System properties of the form netbeans.patches.<module-name> make the difference and obviously allow for patching existing deployments using another module directory. So for each module that may have code changes, a new system proerty has to be defined and passed to the NB Module System:
The netbeans.patches.<module-name> property and many more NB Platform properties are briefly mentioned in the NB document NetBeans Architecture Answers for Module System API module.
Preliminary Status
The changes to the run/debug configurations may not be appropriate. Maybe there are better and easier ways to achieve a hot deployment. If, not, it should at least be possible to specifiy the netbeans.patches.<module-name> properties in the nbm configuration of the project's parent POM. Another option may be to use our own plain Java launcher whose code is following the NB native launcher Unix scripts. See bin/snap and platform/lib/nbexec shell scripts in ${snaptop}/snap-app/target/snap/.
Java Launcher
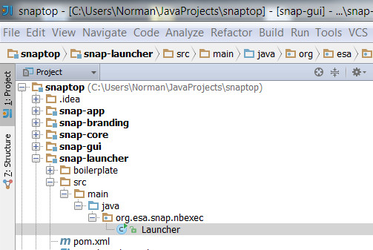
We now have a plain Java laucher which mimics the core functionality of the NB's native launcher nbexec. It can be used for easy debugging of NB Platform applications when using the NB IDE is not an option. The Launcher takes care of any changed code in all the source modules. So, In IntelliJ IDEA we can hit CTRL+F9 and then run/debug the Launcher. To run the Launcher, select it's one and only class and right-click run/debug:
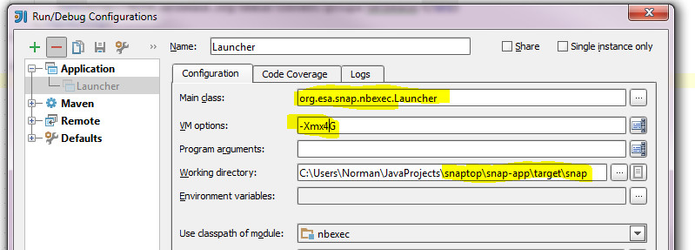
Then set the working directory to the generated SNAP deployment location (snaptop/snap-app/target/snap) and configure system properties as needed:
Refer to the Laucher's class API doc for more information.
